Introduction
This comprehensive guide provides all the necessary details on resizing videos for different social media platforms, including platform-specific dimensions, step-by-step tutorials, and guidance on how AI-driven tools like VFX AI can automate the entire process in minutes Whether you're a content creator, social media manager, or small business owner, you'll learn the best practices for maintaining video quality while adapting your content for maximum reach across every platform.
Why Video Resizing Matters
The video resizing matters due to the following reasons:
The Problem with One-Size-Fits-All Video Content
Every social media platform has different video requirements. YouTube prefers 16:9 widescreen. TikTok demands 9:16 vertical video. LinkedIn favors square 1:1 content.
If you upload a landscape YouTube video directly to TikTok without resizing, here's what happens:
- Tiny video with massive black bars on both sides
- Lost engagement due to poor viewing experience
- Important content (faces, text) cropped out
- Lower completion rates and fewer shares
Why Quality Matters as Much as Dimensions
Improper video sizing results in poor quality. Scaling up from 1280×720 to 1920×1080 results in pixelation and blur. Reducing a high-resolution video to a low resolution is inefficient and makes the video appear unprofessional.
The best approach is to keep the resolution intact while appropriately cropping and reframing the video. This is why resizing tools are important.
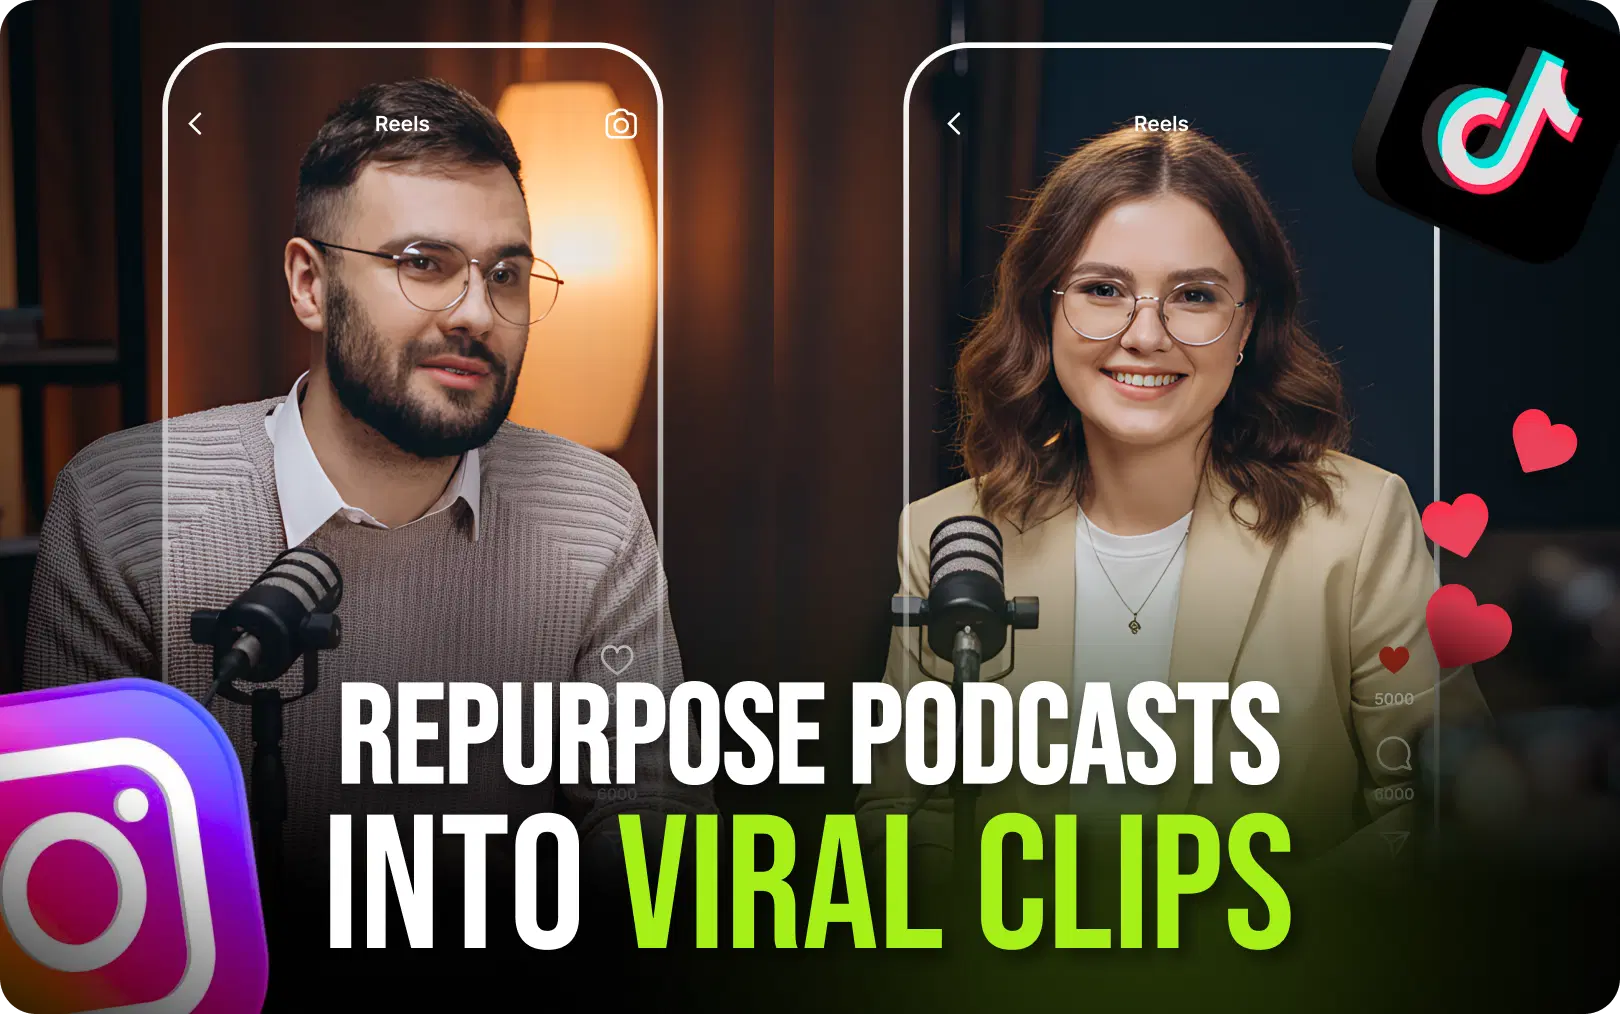
Content Repurposing = Growth Multiplier
With just one video, you can drive traffic to six different sites, provided you format your videos correctly. For example, a 10-minute YouTube video can become:
- Multiple TikTok videos
- Instagram Reels
- YouTube Shorts
- LinkedIn snippets
- Pinterest pins
- Twitter/X clips
This effect builds up over time, but only if your videos are properly formatted for each platform.
Also Read: How to Repurpose Podcasts Into Viral Clips Using AI
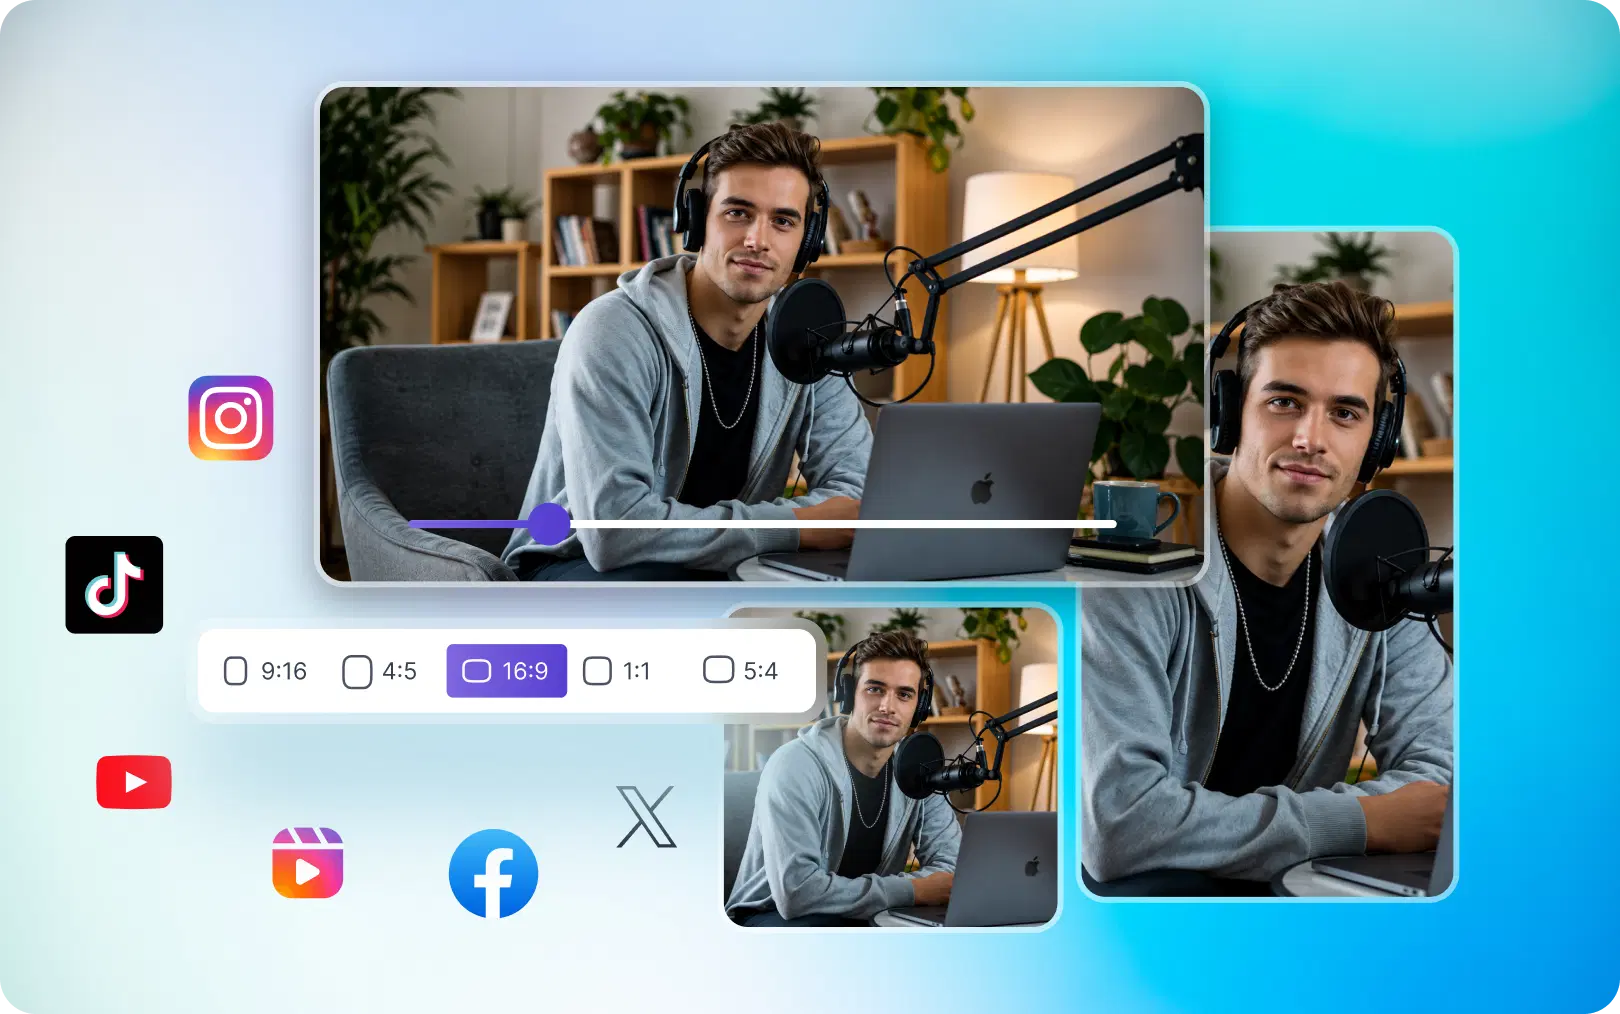
Platform-Specific Video Dimensions
Let's check the best dimensions for each and every platform:
| Platform | Recommended Aspect Ratio | Resolution | Frame Rate | Format |
|---|---|---|---|---|
| Instagram Reels | 9:16 | 1080 × 1920 | 24-60 fps | MP4/MOV |
| TikTok | 9:16 | 1080 × 1920 | 24-60 fps | MP4 |
| YouTube Shorts | 9:16 | 1080 × 1920 | 24-60 fps | MP4/MOV |
| Facebook Reels | 9:16 | 1080 × 1920 | 24-60 fps | MP4 |
| 1:1 or 16:9 | 1080 × 1080 / 1920 × 1080 | 24-60 fps | MP4 | |
| X (Twitter) | 1:1 or 16:9 | 1080 × 1080 / 1920 × 1080 | 24-60 fps | MP4 |
| 9:16 | 1080 × 1920 | 24-60 fps | MP4 | |
| YouTube | 16:9 | 1920 × 1080 (min) | 24-60 fps | MP4/MOV |
Common Video Resizing Mistakes (And How to Avoid Them)
There are a few serious resizing mistakes that people make unknowingly. A few of them includes:
Mistake 1: Cropping Out the Faces
The Problem: Automatically cropping a landscape video to portrait often cuts off faces, important text, or critical visual information.
The Solution: Use AI auto-crop tools that detect faces and subjects, ensuring important content stays in frame. VFX AI's subject tracking automatically keeps faces centered.
Mistake 2: Using the Wrong Aspect Ratio
The Problem: Uploading a 16:9 YouTube video to Instagram without resizing creates massive black bars and wastes screen space.
The Solution: Always check platform-specific recommendations (see table above). When in doubt, use 9:16 for vertical platforms and 16:9 for horizontal.
Mistake 3: Stretching Instead of Cropping
The Problem: Manually stretching a 1280×720 video to fit 1920×1080 creates pixelated, blurry output that looks unprofessional.
The Solution: Resize intelligently. If the aspect ratio differs significantly, crop intelligently rather than stretch. AI tools handle this automatically.
Mistake 4: Exporting in Low Resolution
The Problem: Saving videos at 480p or 720p results in blurry, low-quality output on modern devices.
The Solution: Always export at 1080p minimum, even for short-form content. Platforms will compress further, but starting with high quality ensures your final output looks crisp.
The Problem: Placing important text or faces near video edges results in them being cut off on certain devices or when captions are added.
Mistake 5: Ignoring Platform-Safe ZonesThe Problem: Placing important text or faces near video edges results in them being cut off on certain devices or when captions are added.
The Solution: Keep important content in the center 80% of the frame. Leave padding for captions, buttons, and overlays.

Resize Videos Online for Free
The steps to resize videos online for free are very simple. Choose from the below options and get started:
Option 1: Using AI-Driven Video Resizers
VFX AI clip maker is the fastest and easiest option for modern content creators. They automatically detect subjects, maintain quality, and export for multiple platforms.
Advantages:
- No software installation required
- AI handles cropping and reframing automatically
- Batch process multiple videos
- Export for multiple platforms simultaneously
- Maintains video quality
- No watermarks
- Fast cloud-based processing
Best for: Content creators, agencies, and anyone who values time and ease of use.
Option 2: Traditional Online Video Editors
Browser-based editors like DaVinci Resolve or Kapwing offer manual resizing and cropping capabilities.
Advantages:
- Free tier available
- Some offer batch processing
- Intuitive drag-and-drop interface
Disadvantages:
- Manual cropping required (tedious for multiple videos)
- Slower processing speeds
- May add watermarks on free tier
- Requires more editing knowledge
Best for: Users with basic resizing needs or those who prefer granular control.
Option 3: Desktop Software
Programs like Adobe Premiere Pro offer powerful editing capabilities.
Advantages:
- Professional-grade quality
- Unlimited customization
- Batch processing capabilities
- No watermarks
Disadvantages:
- Steep learning curve
- Requires software download and installation
- Processing is slower than cloud-based tools
- Overkill for simple resizing tasks
Best for: Professional editors or those working on complex projects.
Why AI Video Resizers Win
When you need to resize videos quickly without compromising quality, AI-powered tools are the clear winner. They combine speed, ease of use, and quality in a way traditional tools simply can't match.
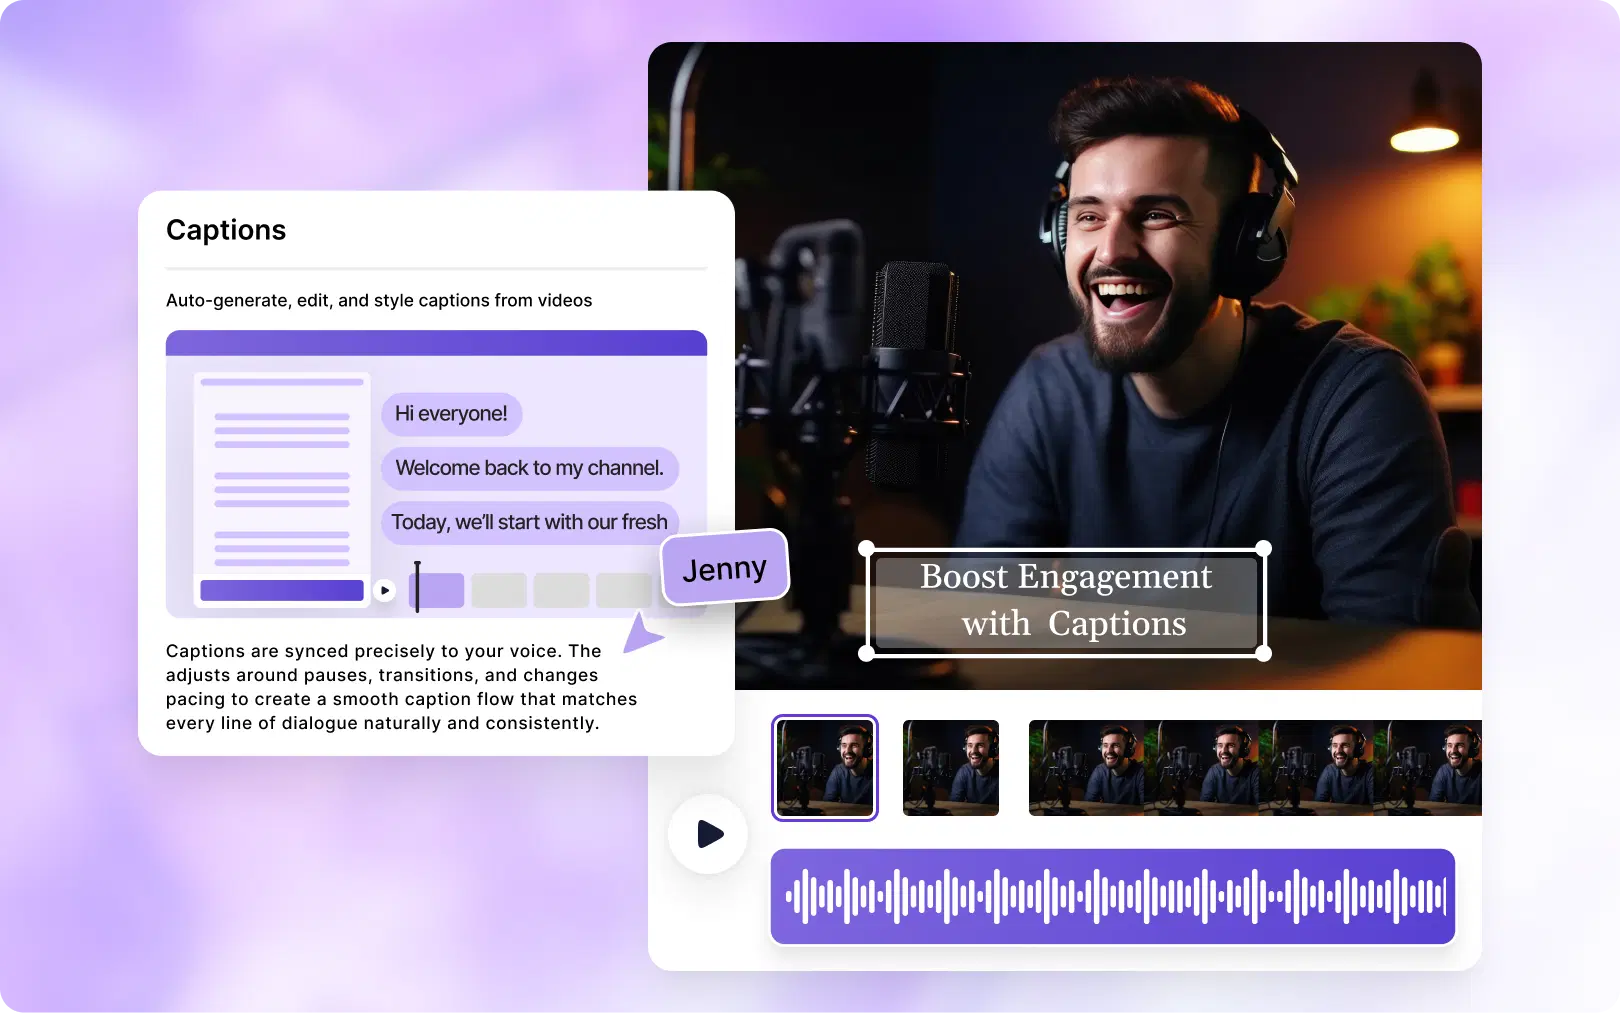
Step-by-Step: Resizing Videos with VFX AI
But first let's know about what exactly is VFX AI? VFX AI is an AI-driven video editor designed specifically for content creators who need to resize, crop, and repurpose videos across multiple platforms instantly. No editing experience required.
Step 1: Upload Your Video
Visit vfxai.com and click "Get Started" or "Upload Video." Select your file from your computer. VFX AI supports MP4, MOV, AVI, and most common video formats.
The platform will automatically detect your video's current dimensions and aspect ratio.
Step 2: Choose Your Destination Platform
Instead of manually calculating aspect ratios, simply select which platform you want to resize for:
- Instagram Reels
- TikTok
- YouTube Shorts
- X (Twitter)
Step 3: Let AI Auto-Crop Your Video
This is where the magic happens. VFX AI's smart reframe technology:
- Detects the main subject (faces, products, text)
- Intelligently reframes the video for the new aspect ratio
- Keeps important content in the center
- Maintains video quality
No manual cropping. No guesswork. Just click and let AI handle it.
Step 4: Preview Your Output
Before exporting, preview exactly how your video will look. See if the framing works for you. VFX AI shows you:
- The exact dimensions
- How the video appears on the target platform
- Whether important content is visible
- Text overlay placement
Step 5: Download and Publish Instantly
Your resized video is ready. Download it directly to your computer or mobile device. Upload to your chosen platform immediately.
From upload to download: typically 2-5 minutes for most videos.
Real-World Example: Repurposing One YouTube Video
Imagine you've created a 16:9 landscape YouTube video (1920 × 1080) that's 5 minutes long.
Manually Resizing (Traditional Approach):
- Open each platform's requirements (15 minutes research)
- Use Premiere Pro to resize for Instagram (30 minutes)
- Resize for TikTok (30 minutes)
- Resize for LinkedIn (30 minutes)
- Export and check quality (20 minutes)
- Total time: 2.5 hours
Using VFX AI:
- Upload video (1 minute)
- Select Instagram, TikTok, LinkedIn from dropdown (2 minutes)
- Let AI auto-crop each version (3 minutes processing)
- Preview and export all three (5 minutes)
- Total time: 11 minutes
That's a 92% time savings per video. For an agency managing 50+ videos per month, that's 80+ hours saved monthly.
Also Check: VFX AI Instant B-Roll
Manual vs. AI: Which Approach Is Right for You?
Let's now compare between manual vs AI approaches and decide which one to choose when.
| Factor | Manual Editing | Traditional Video Editors | VFX AI |
|---|---|---|---|
| Time per video | 30-60 min | 15-30 min | 2-5 min |
| Ease of use | Difficult | Moderate | Very easy |
| Auto crop | No | Limited | Yes (AI-driven) |
| AI subject tracking | No | No | Yes |
| Multi-platform export | No | Limited | Yes (simultaneous) |
| Watermark | No | Often yes | No |
| Learning curve | High | Moderate | Minimal |
| Speed | Slow | Moderate | Fast (cloud-based) |
| Best for | Complex edits | Hobbyists | Professionals & creators |
When to Use Each Approach
Use Manual Editing When:
- You need frame-by-frame precision
- You're creating complex, multi-scene edits
- You have significant effects or color grading needs
- You're willing to spend hours perfecting one video
Use Traditional Video Editors When:
- You need some basic cropping and resizing
- You want moderate control without learning complex software
- You're editing multiple videos but don't need AI automation
- Speed isn't your primary concern
Use VFX AI When:
- You resize videos regularly for multiple platforms
- You want AI-driven auto-crop and subject tracking
- Time is valuable (which it always is)
- You need watermark-free, professional output
- You're managing content at scale
- You prioritize ease of use over advanced features
For 95% of content creators and small business owners, VFX AI is the better choice. It saves time, maintains quality, and requires zero editing experience.
Pro Tips for Resizing Videos Without Quality Loss
Below are a few tips to follow while resizing videos without losing quality:
Tip 1: Start with High-Resolution Source Material
Always shoot or source videos at the highest resolution possible. If you start with 1920×1080, you can comfortably resize to 1080×1920 (and vice versa) without quality loss. Starting with 720p or lower often results in pixelation when resized for modern platforms.
Tip 2: Keep Your Main Subject Centered
Whether using manual editing or AI auto-crop, keeping the primary subject (face, product, text) centered ensures nothing gets cropped out during resizing.
For interviews: frame the speaker in the center. For product shots: center the product. For text overlays: keep critical information in the center 70% of the frame.
Tip 3: Leave Space for Captions
Modern video content is often watched on mute with captions enabled. Reserve the bottom 10-15% of your video for caption space. VFX AI's preview shows exactly where captions will appear, so you can adjust framing before exporting.
Tip 4: Export at 1080p Minimum, Even for Short-Form Content
Social platforms compress all videos. If you export at 1080p, after platform compression, it still looks crisp on mobile devices. Exporting at 720p or lower results in blurry, low-quality output after compression.
Tip 5: Test Your Resized Video on Multiple Devices
Before publishing, preview your resized video on:
- Desktop browsers
- iOS mobile
- Android mobile
- Tablets
This ensures framing, text visibility, and overall quality look good across all devices.
Tip 6: Maintain Consistent Branding Across Platforms
Even though videos are resized, maintain consistent:
- Color grading
- Font choices
- Logo placement
- Opening/closing sequences
This builds brand recognition across platforms.
Your Video Resizing Solution
Video resizing isn't a one-size-fits-all task. Every platform has different requirements, and resizing incorrectly wastes your content's potential.
The traditional approach, manually resizing each video for each platform is outdated. It's slow, error-prone, and ignores your other 50 creative projects that actually matter.
Here's What Changes When You Switch to Smart Resizing:
Before (Manual Resizing):
- One video takes 2+ hours to resize for three platforms
- Constant worry about aspect ratios and dimensions
- Often stretches or crops important content
- Inconsistent quality across platforms
- Watermarks on free tools
- Frustration with complex software
After (AI-Driven Resizing with VFX AI):
- One video resizes for all platforms in under 15 minutes
- AI automatically handles cropping and framing
- Important content stays in frame, every time
- Professional quality, consistent across platforms
- No watermarks, no software to learn
- Time freed up for actual creative work
Try VFX AI today and experience what fast, intelligent video resizing actually looks like. Your content deserves to look professional on every platform without the 2-hour manual editing session.
Start resizing videos smarter. Visit VFX AI and create your first resized video in minutes. Free to try, zero credit card required. Your future self will thank you for the time saved.